.png)
Chekkit Forms
Chekkit Forms let you collect private feedback from customers — perfect for insights that go beyond public reviews. Responses are stored in your Chekkit account, not published online. You can send forms by text, attach them in Messenger, or embed them on your website. Each submission starts or continues a customer conversation so your team can follow up.
What it does
- Build custom questionnaires with drag-and-drop questions and multiple field types.
- Send a form link to customers through Messenger using a short code or the Attach form button.
- Embed a form on your website so visitors can fill it out without texting first.
- Review answers on the Responses tab or inside the customer's Messenger thread.
- Export responses to CSV for reporting.
- Automatically create a Pipeline card (ticket) from every submission so nothing slips through the cracks.
Open the forms builder
- Log in to your Chekkit dashboard.
- Open Forms in the navigation:
- Sidebar layout: Customer Forms → Build a form
- Classic top navigation: Forms → Create Forms
This opens the forms builder at /forms. If you have no forms yet, click New form to get started.
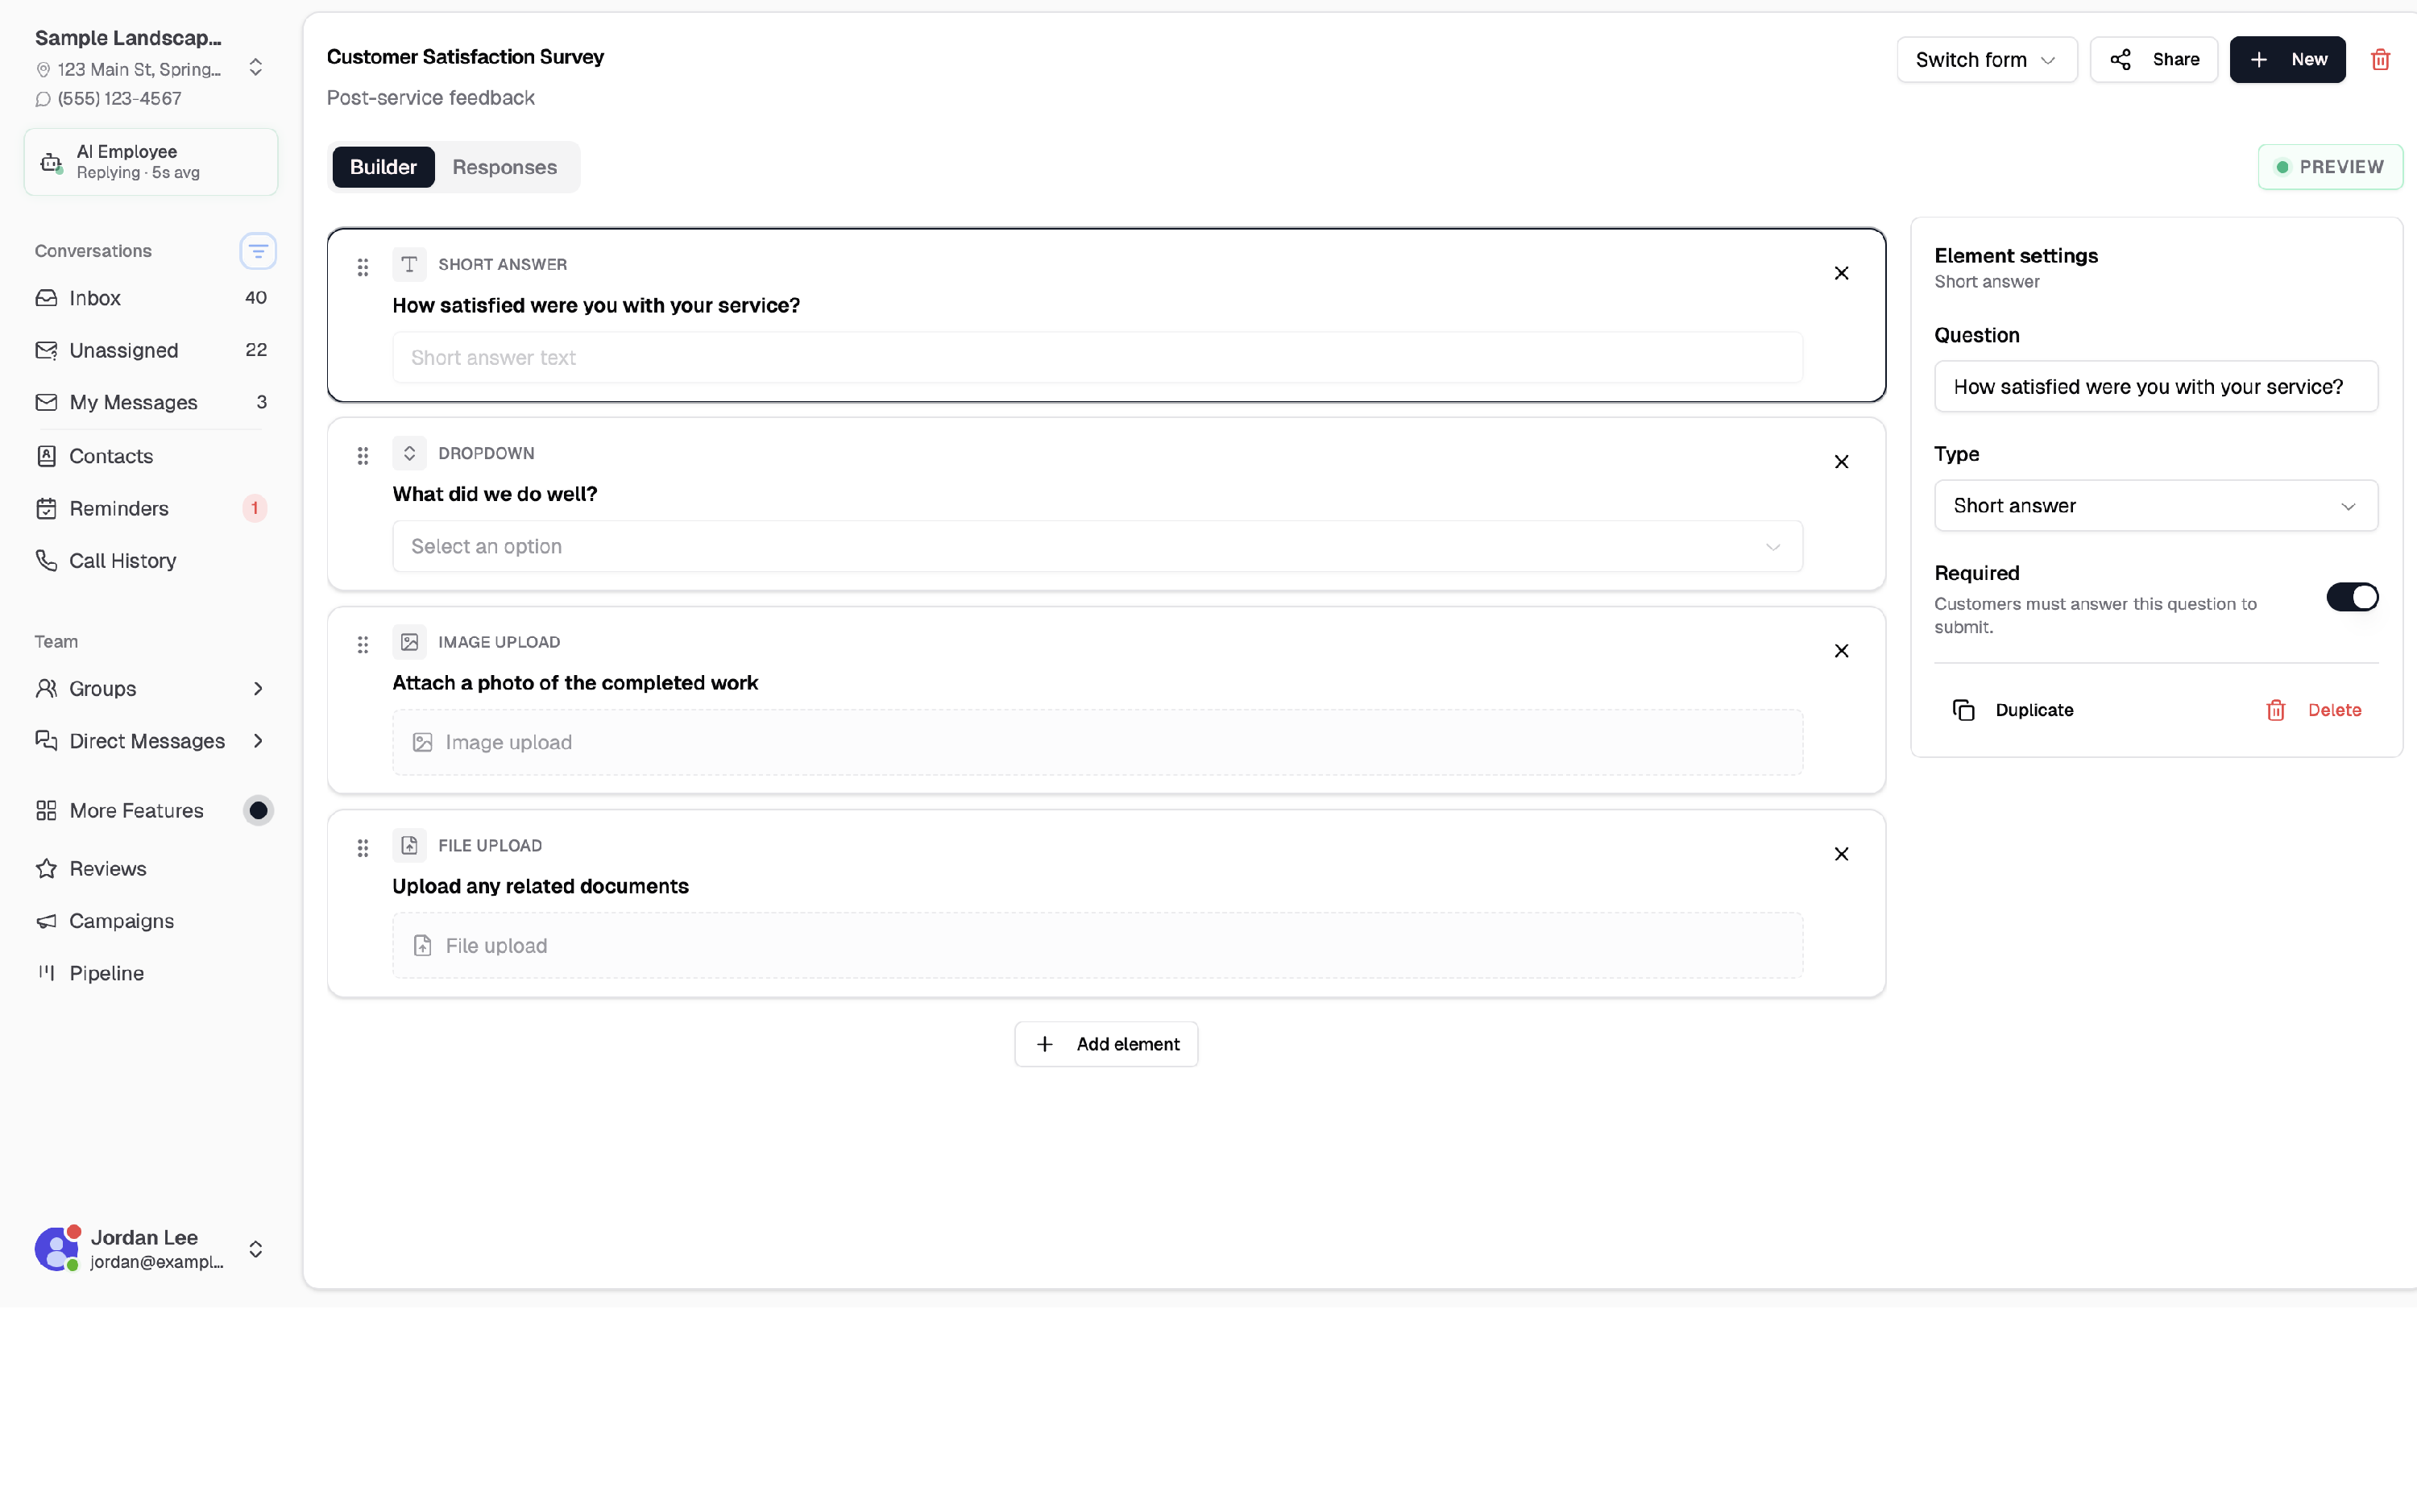
Create a form
- Click New (or New form on the empty state).
- In Create a new form, enter:
- Title — what customers see when they open the form
- Description — an internal note for your team (customers do not see this on messenger-sent forms)
- Click Save.
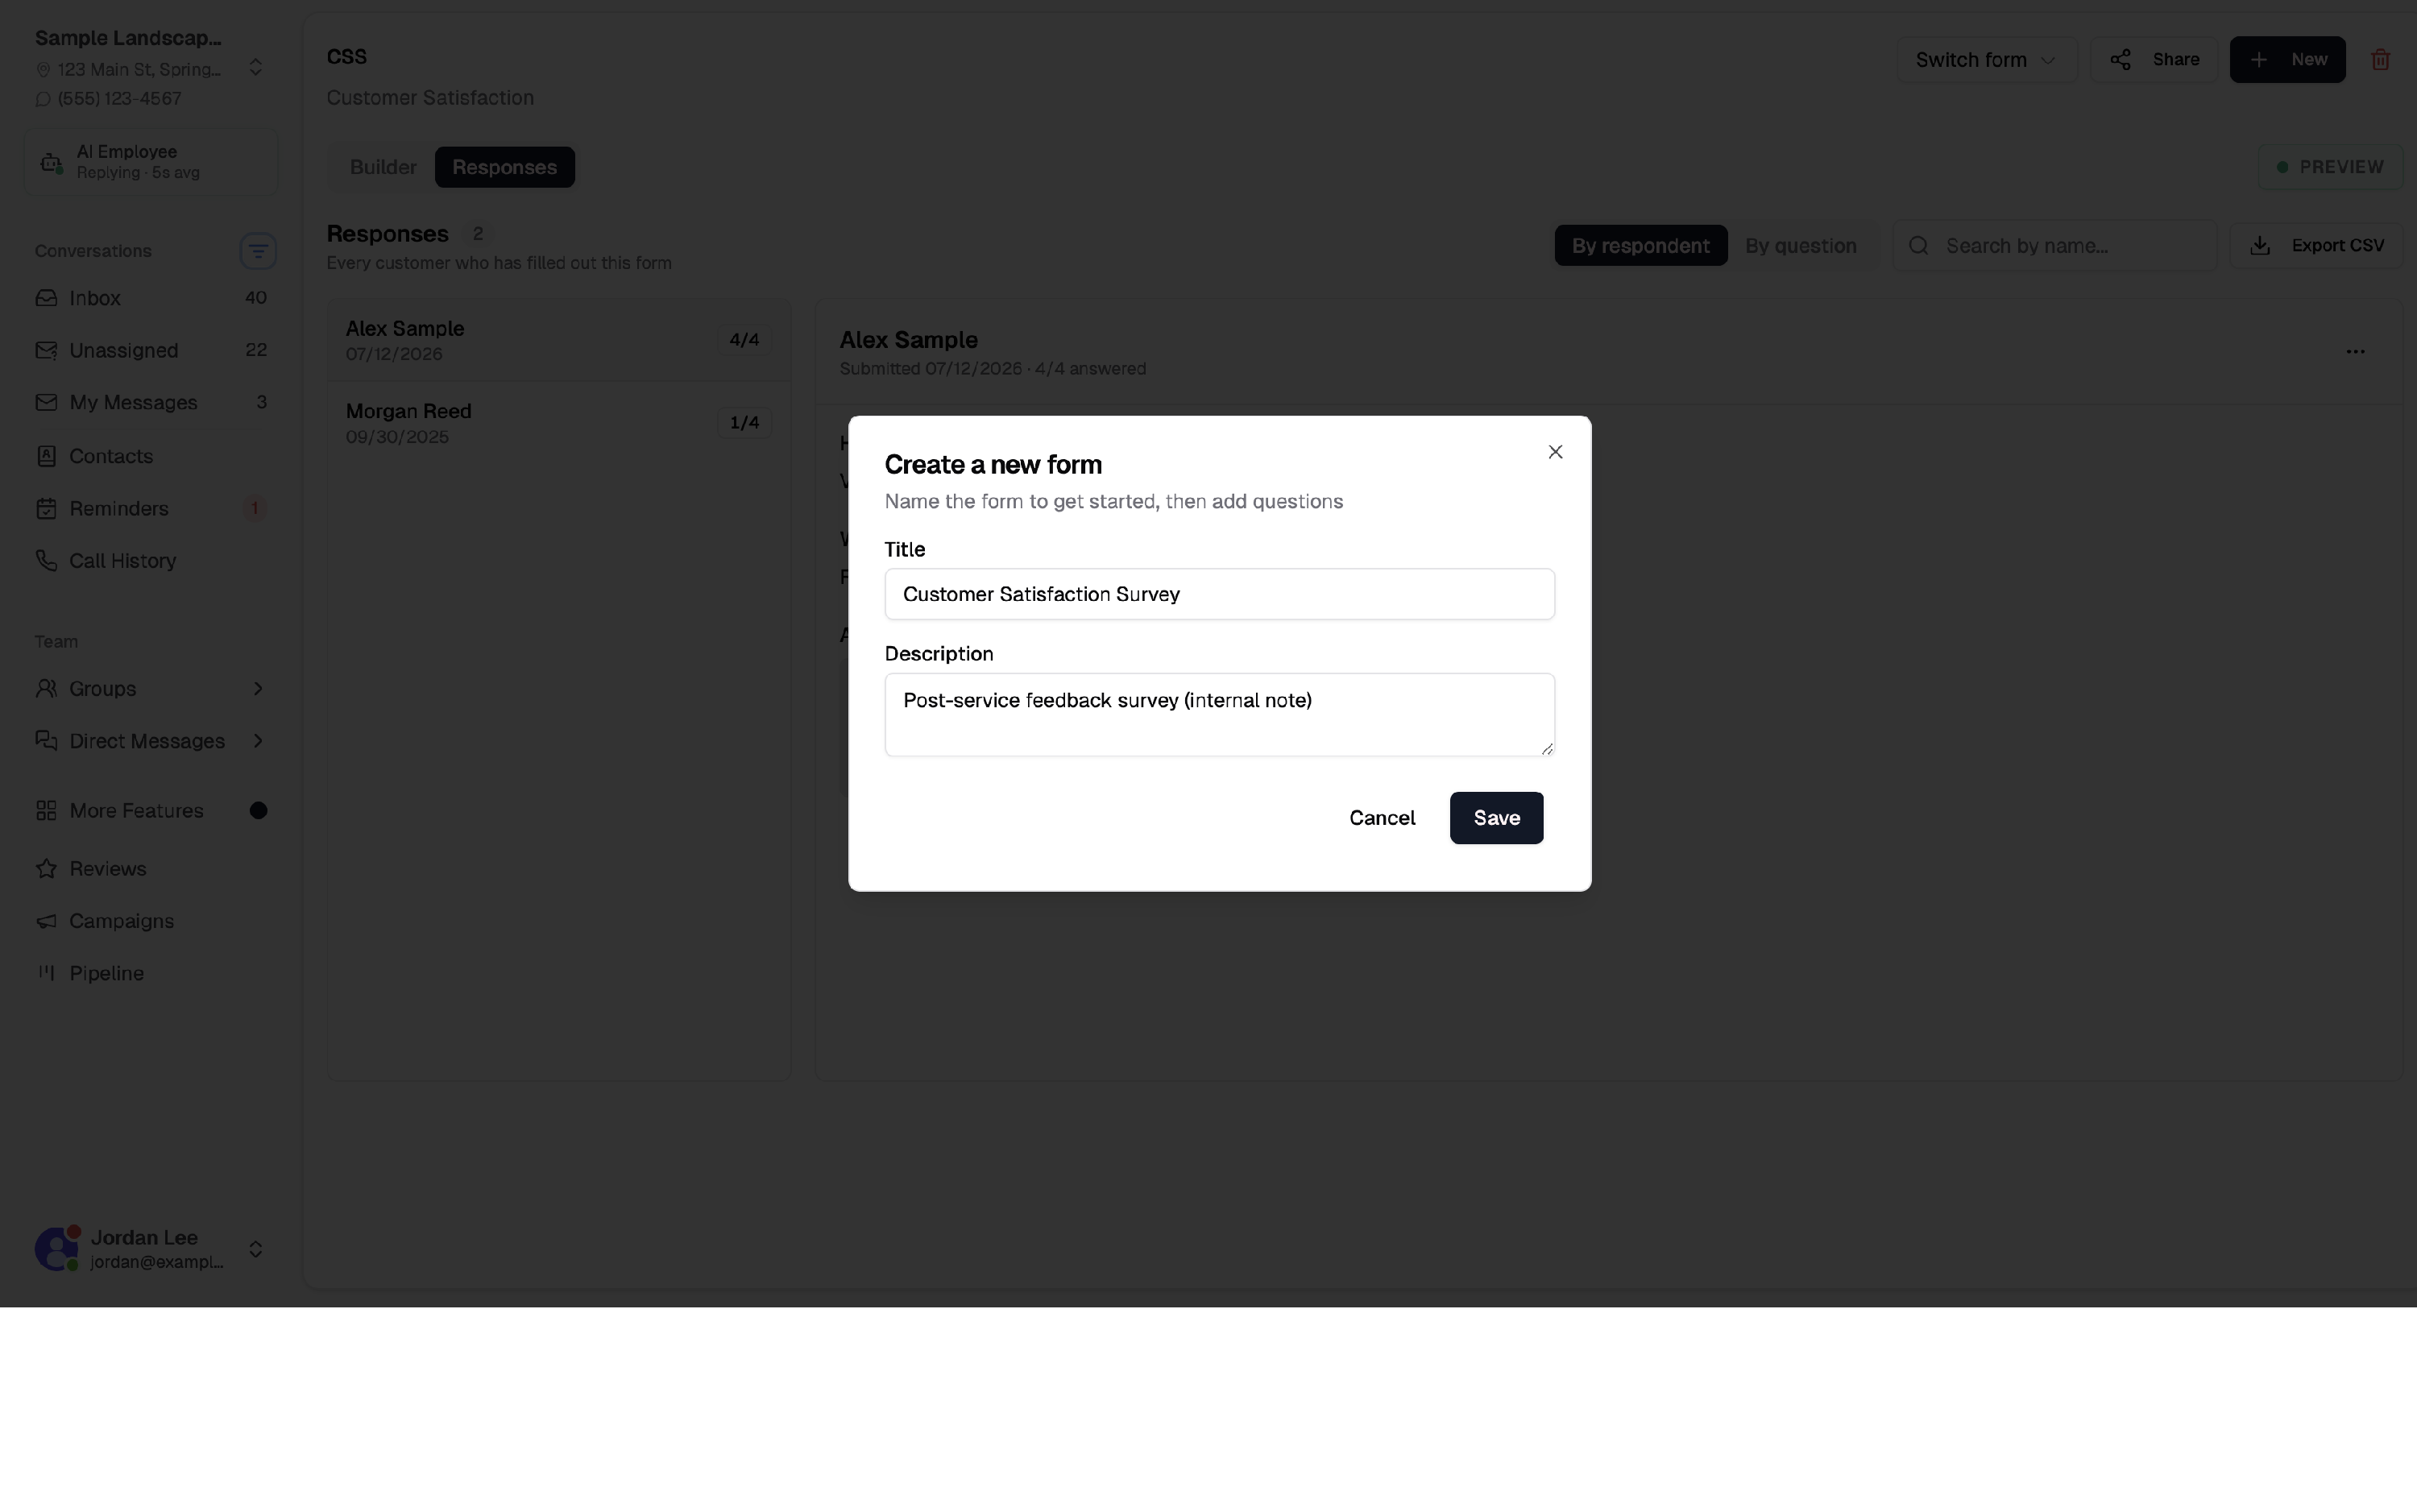
You can switch between forms anytime using the form picker at the top of the page. Edit the title or description inline — changes save automatically.
Build your form
On the Builder tab:
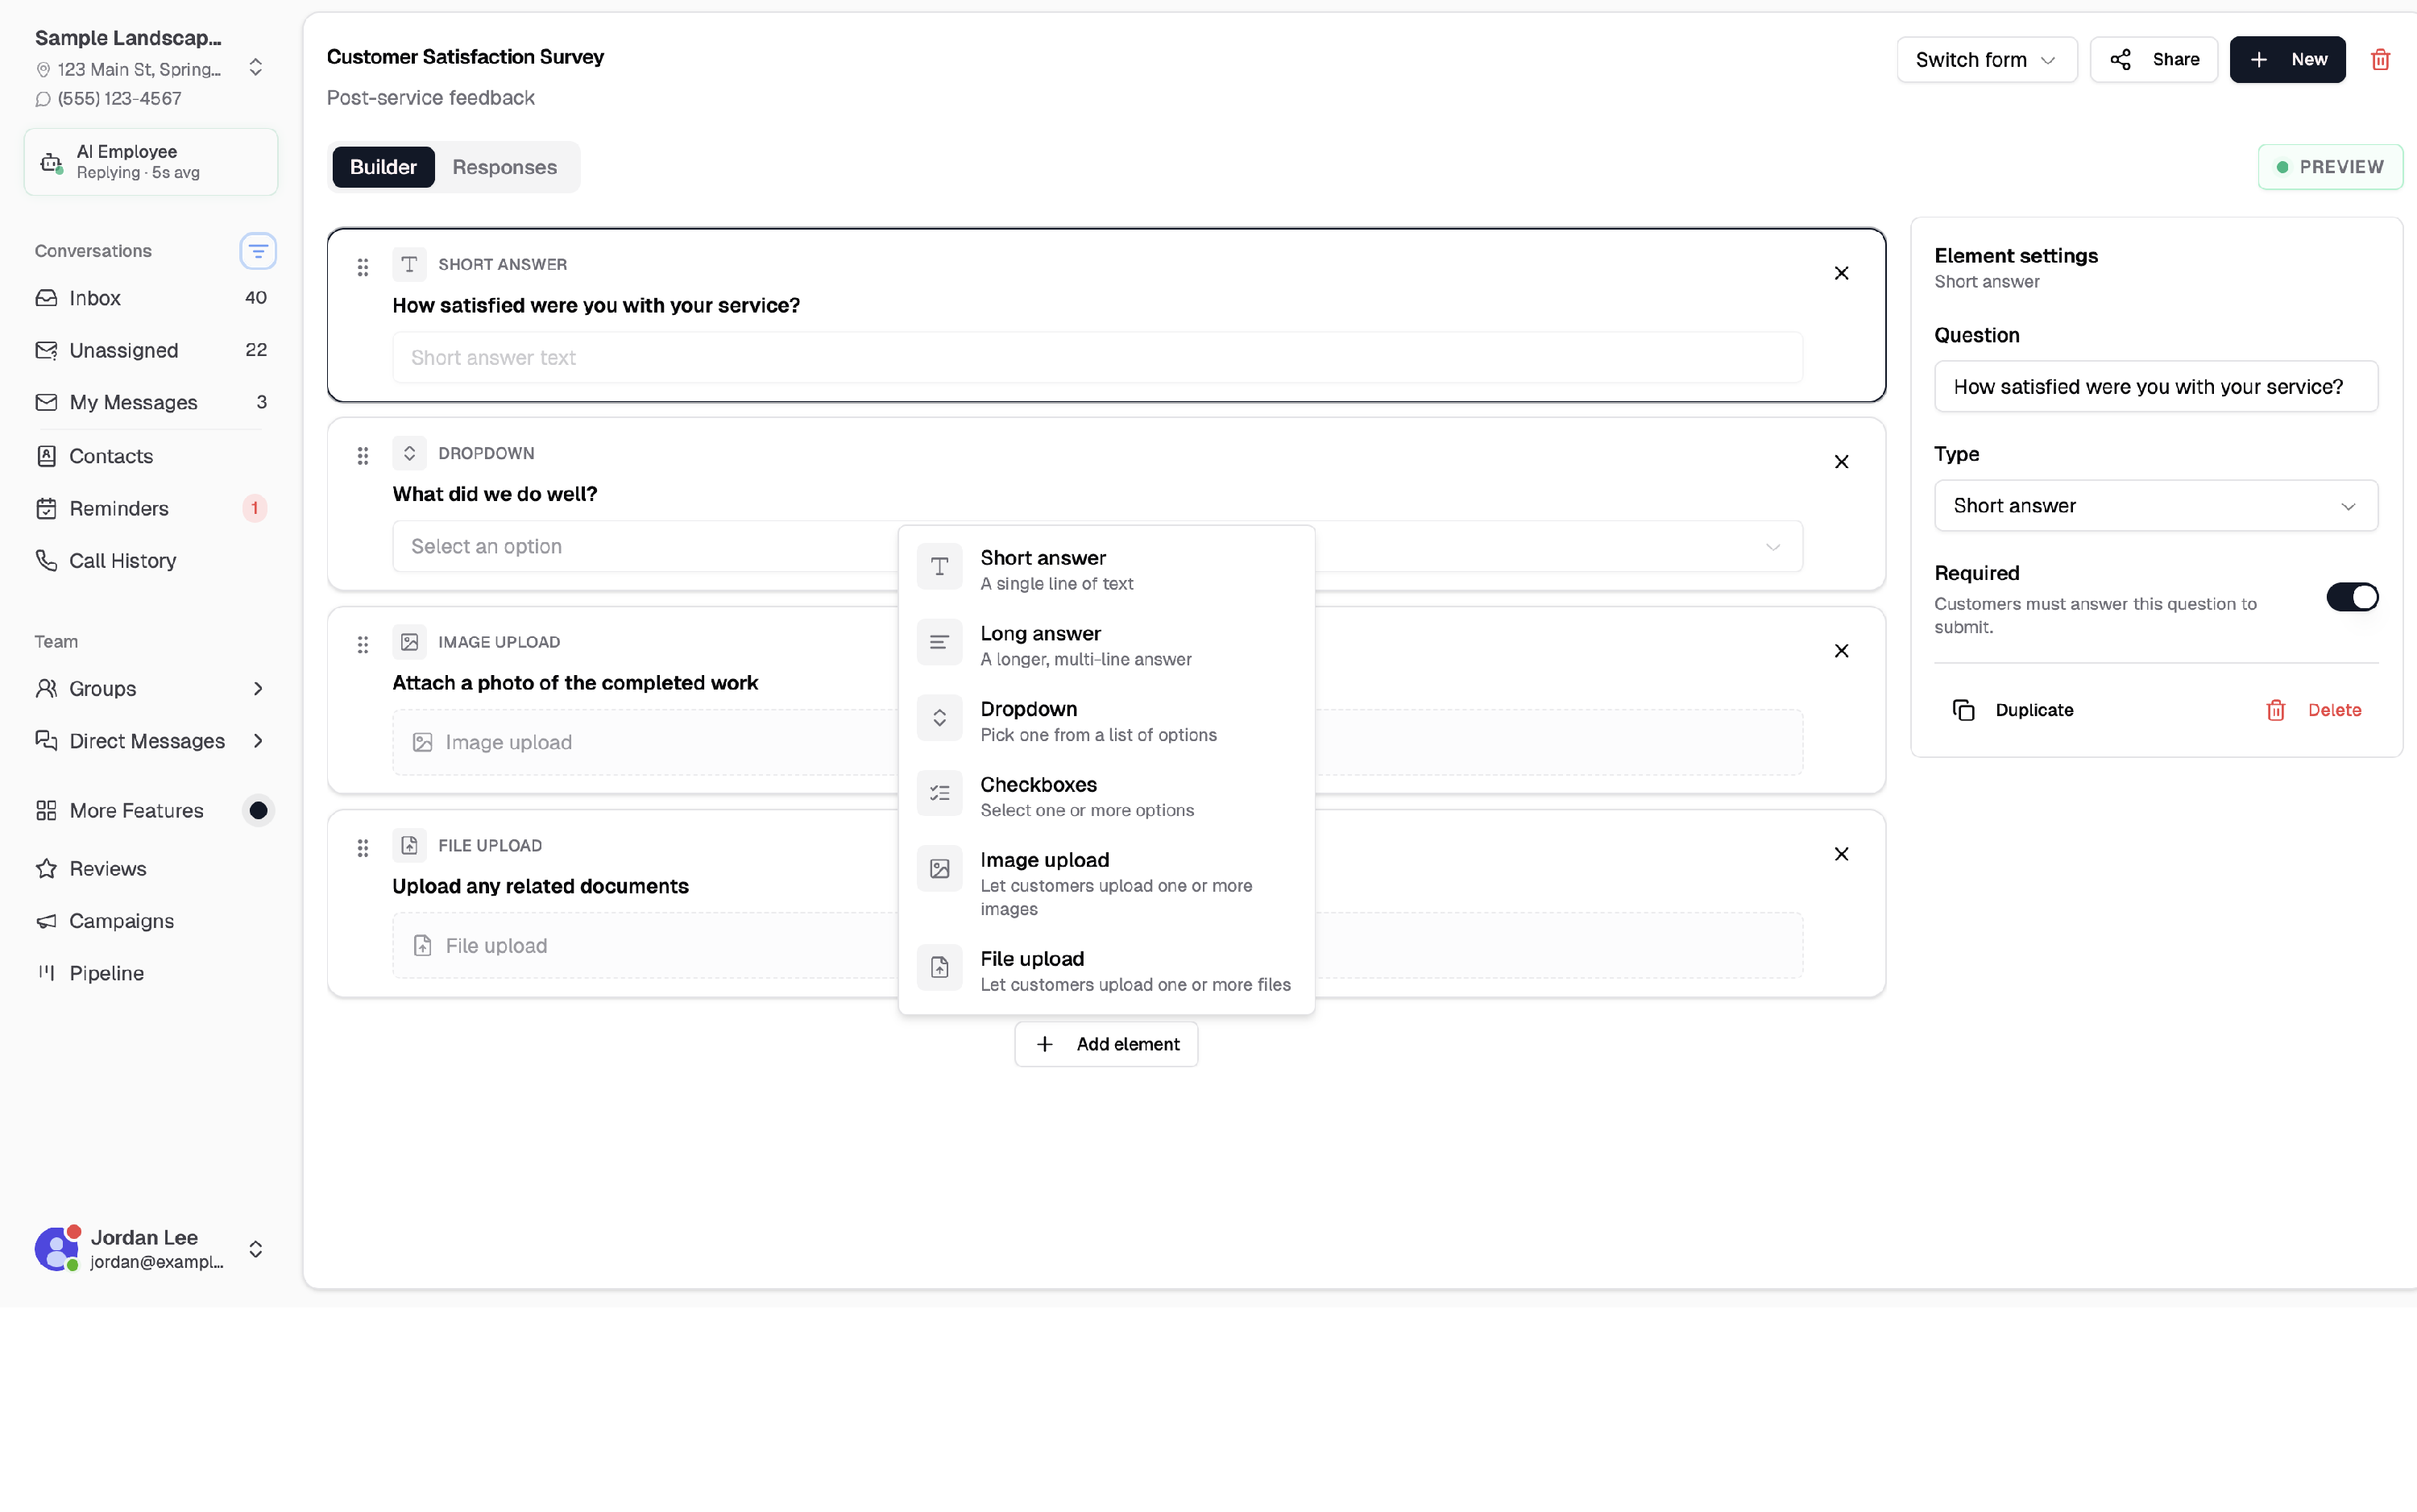
- Click Add element (or the + divider between questions) to add a question.
- Choose a field type:
| Field type | Best for |
|---|---|
| Short answer | A single line of text |
| Long answer | Multi-line feedback or comments |
| Dropdown | One choice from a list you define |
| Checkboxes | Multiple choices from a list |
| Image upload | Let customers attach a photo |
| File upload | Let customers attach a document or other file |
Click a question to open Element settings on the right:
- Question — edit the label customers see
- Type — change the field type
- Required — turn on if customers must answer before submitting
- Duplicate or Delete — copy or remove the question
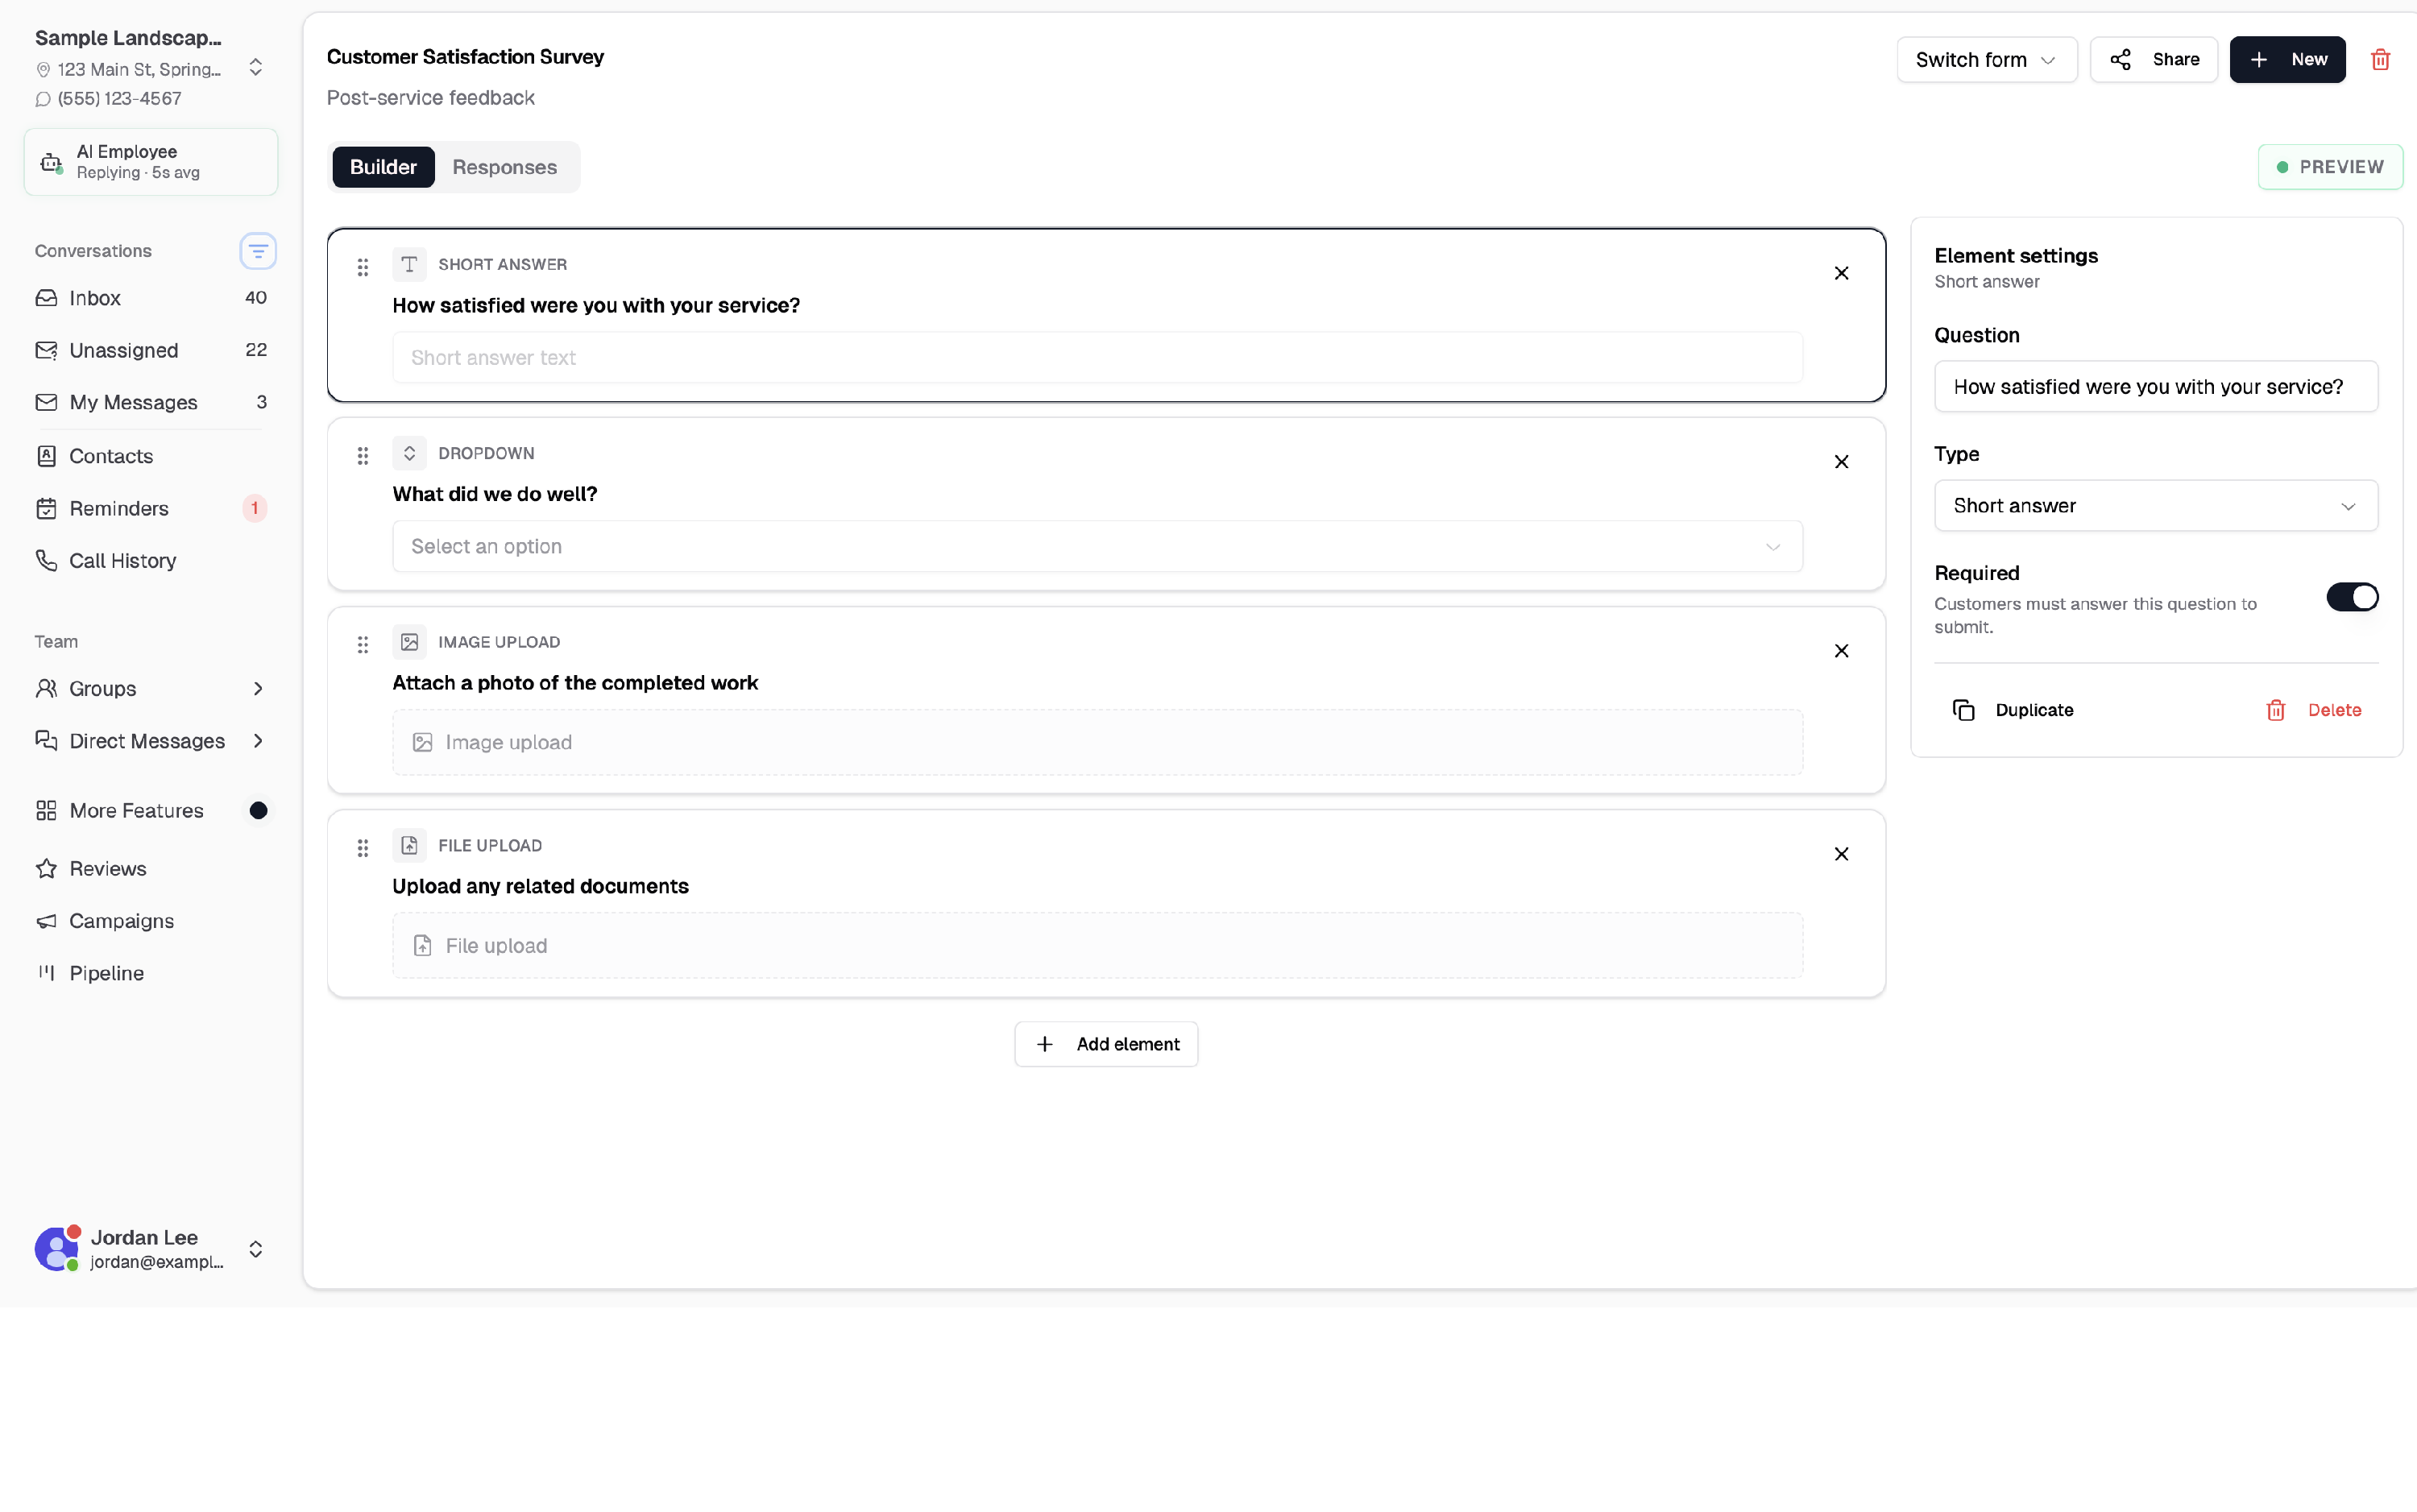
Drag the handle on a question to reorder it. Chekkit auto-saves your work — look for Saved with a timestamp in the top right. There is no separate Save button for individual questions.
Click Preview anytime to see what customers will experience before you send or embed the form.
Send a form through Messenger
There are two ways to send a form in a text conversation:
Option 1: Messenger code
- Click Share on the form.
- Under Messenger code, copy the code (for example, ((form1))).
- Paste the code into your message in Messenger and send it.
When the message sends, Chekkit replaces the code with a link to the form.
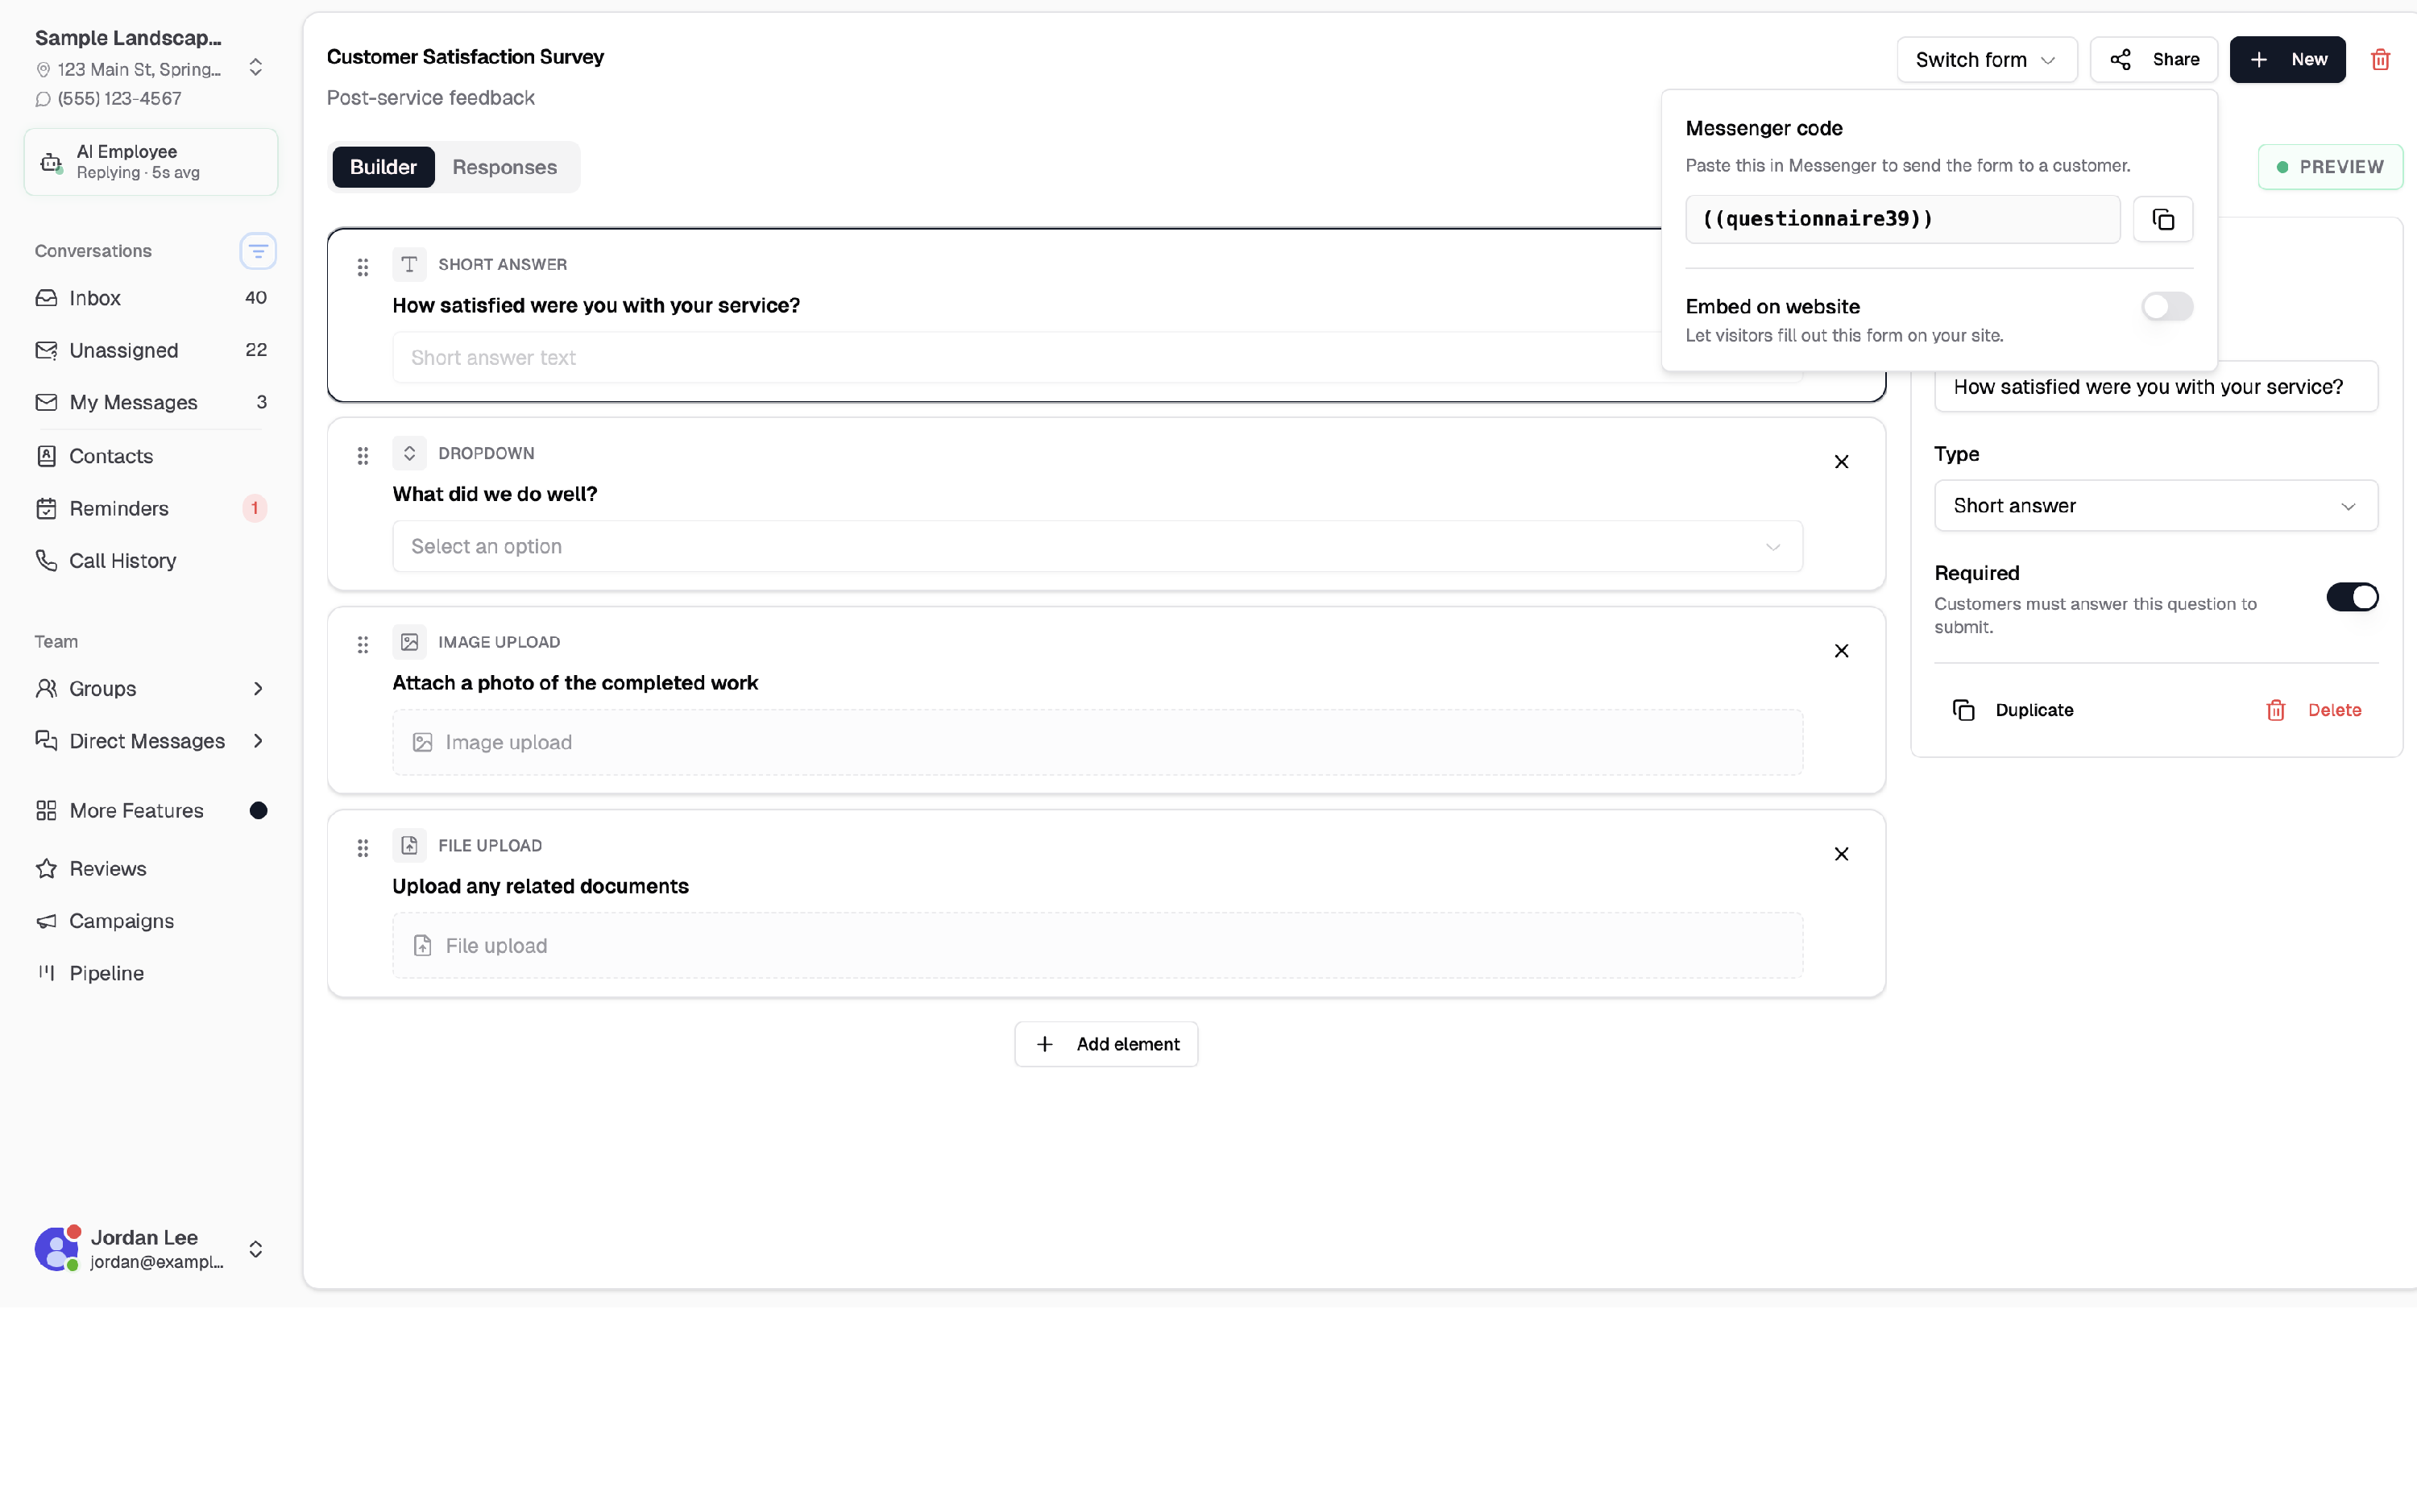
Option 2: Attach form
- In a Messenger conversation, click Attach form in the message composer.
- Search for and select the form you want.
- Send the message — the form link is inserted automatically.
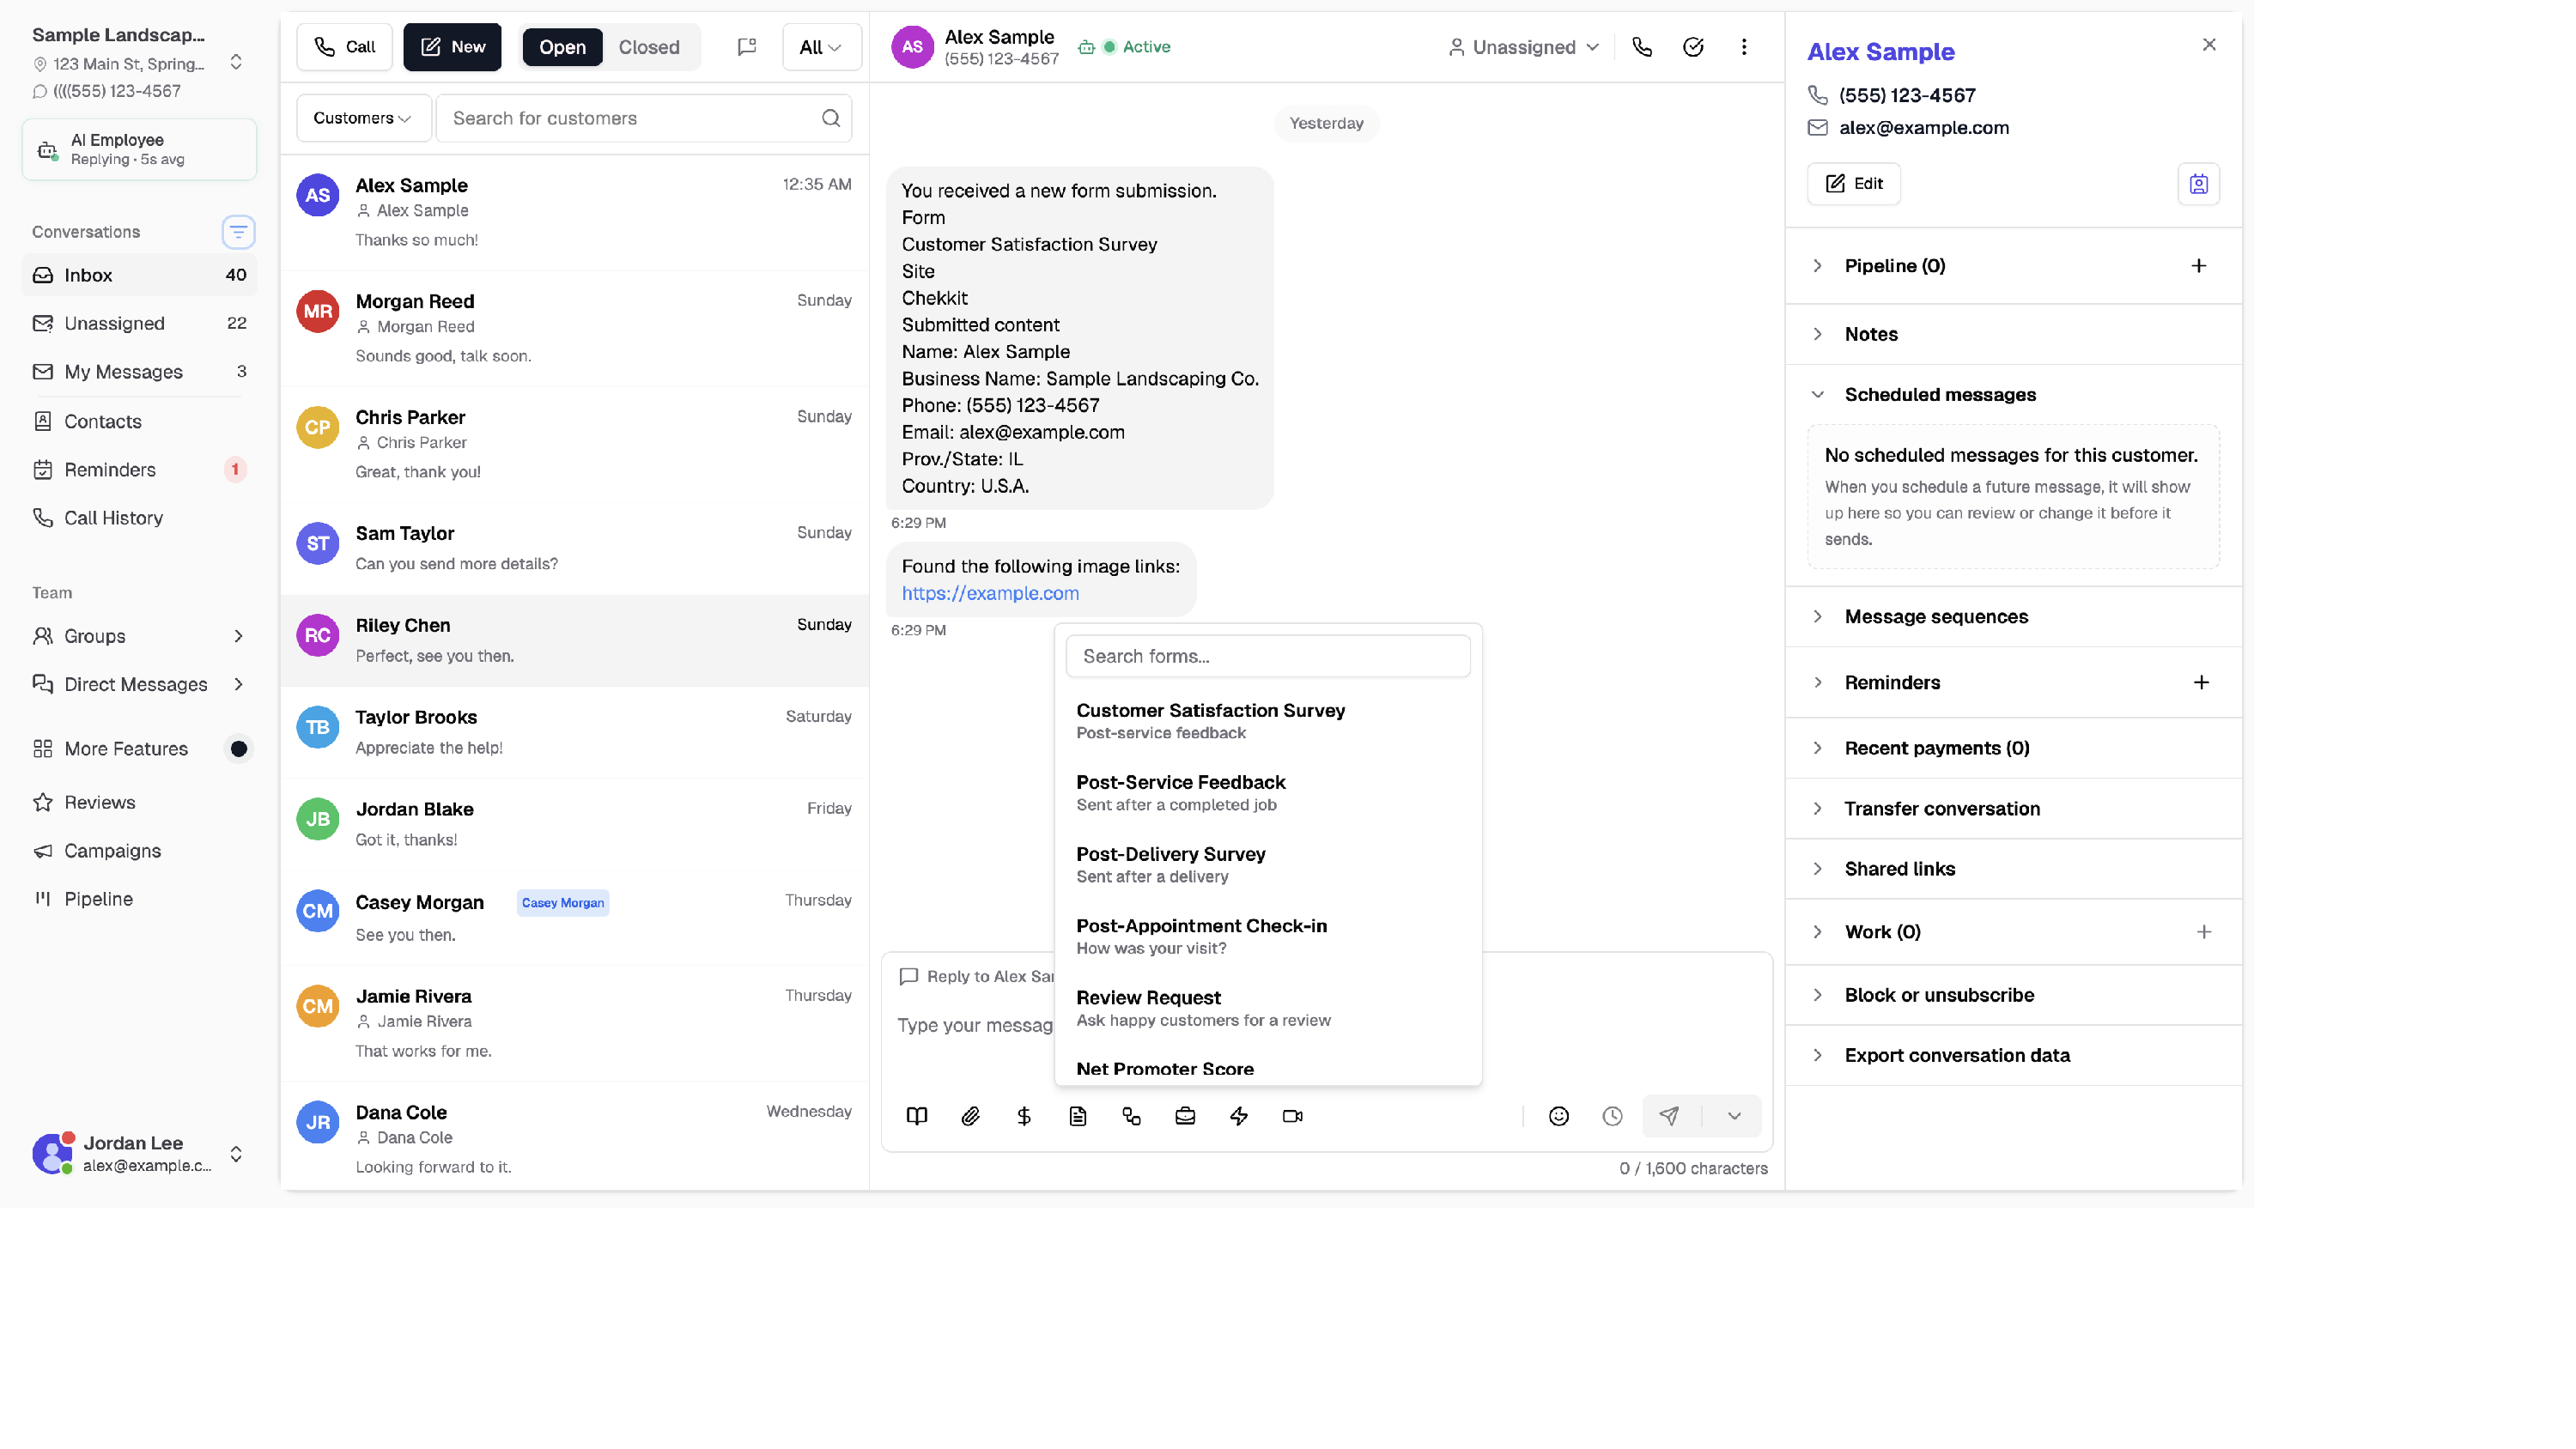
When a customer submits the form, you'll see a notice in the conversation with View responses so you can read their answers without leaving Messenger.
Embed a form on your website
- Click Share on the form.
- Turn on Embed on website.
- Choose what contact info visitors must provide:
- Phone or email
- Phone only
- Email only
- Phone and email
- If your account has multiple locations, you can turn on Multi-location so visitors pick which location their submission belongs to.
- Click Copy embed code and paste the snippet on your website where you want the form to appear.
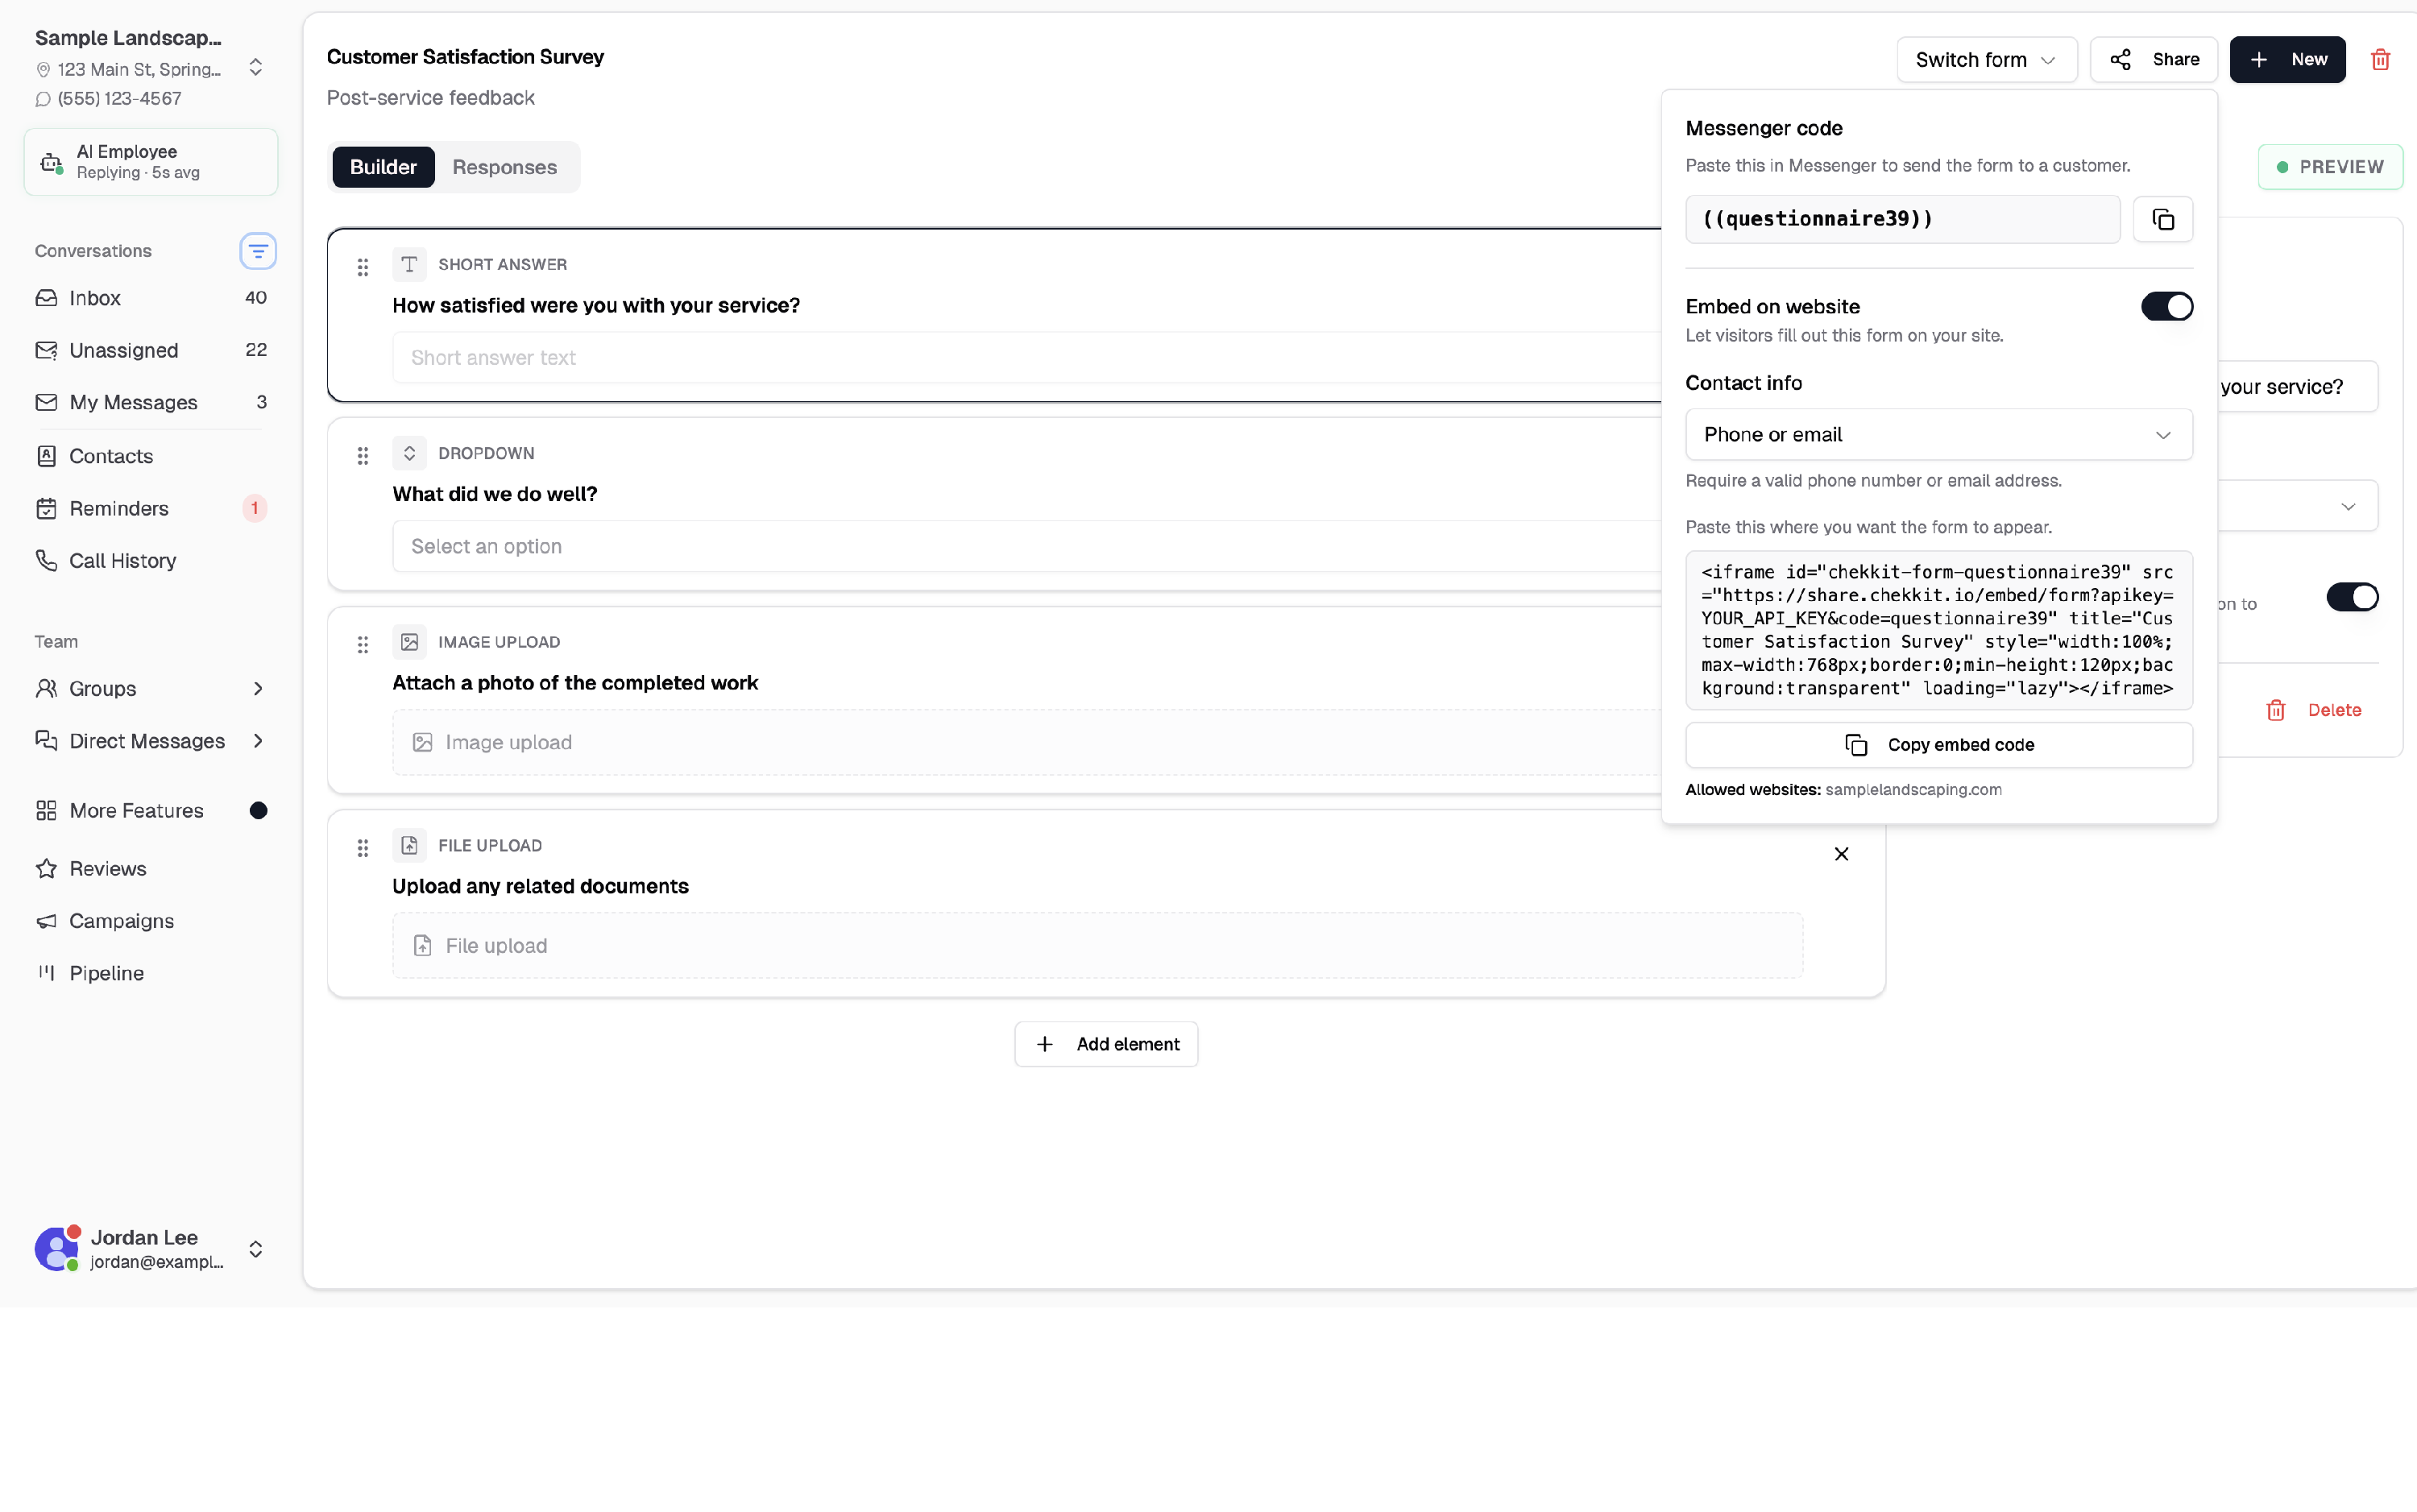
Your website must be on the Allowed websites list. You can manage allowed domains in the Share popover or under Settings → Textchat → Allowed Websites.
Note: This is different from Settings → Opt-In Form (SMS marketing sign-up) and Settings → Website Form (emailing external form submissions to your inbox).
Review responses
- Open the form and go to the Responses tab.
- Switch between:
- By respondent — one row per customer who submitted
- By question — answers grouped by question
- Use Search by name... to find a specific customer.
- Click Export CSV to download responses.
- Select a respondent to see their full answers, then click Send message to open their conversation.
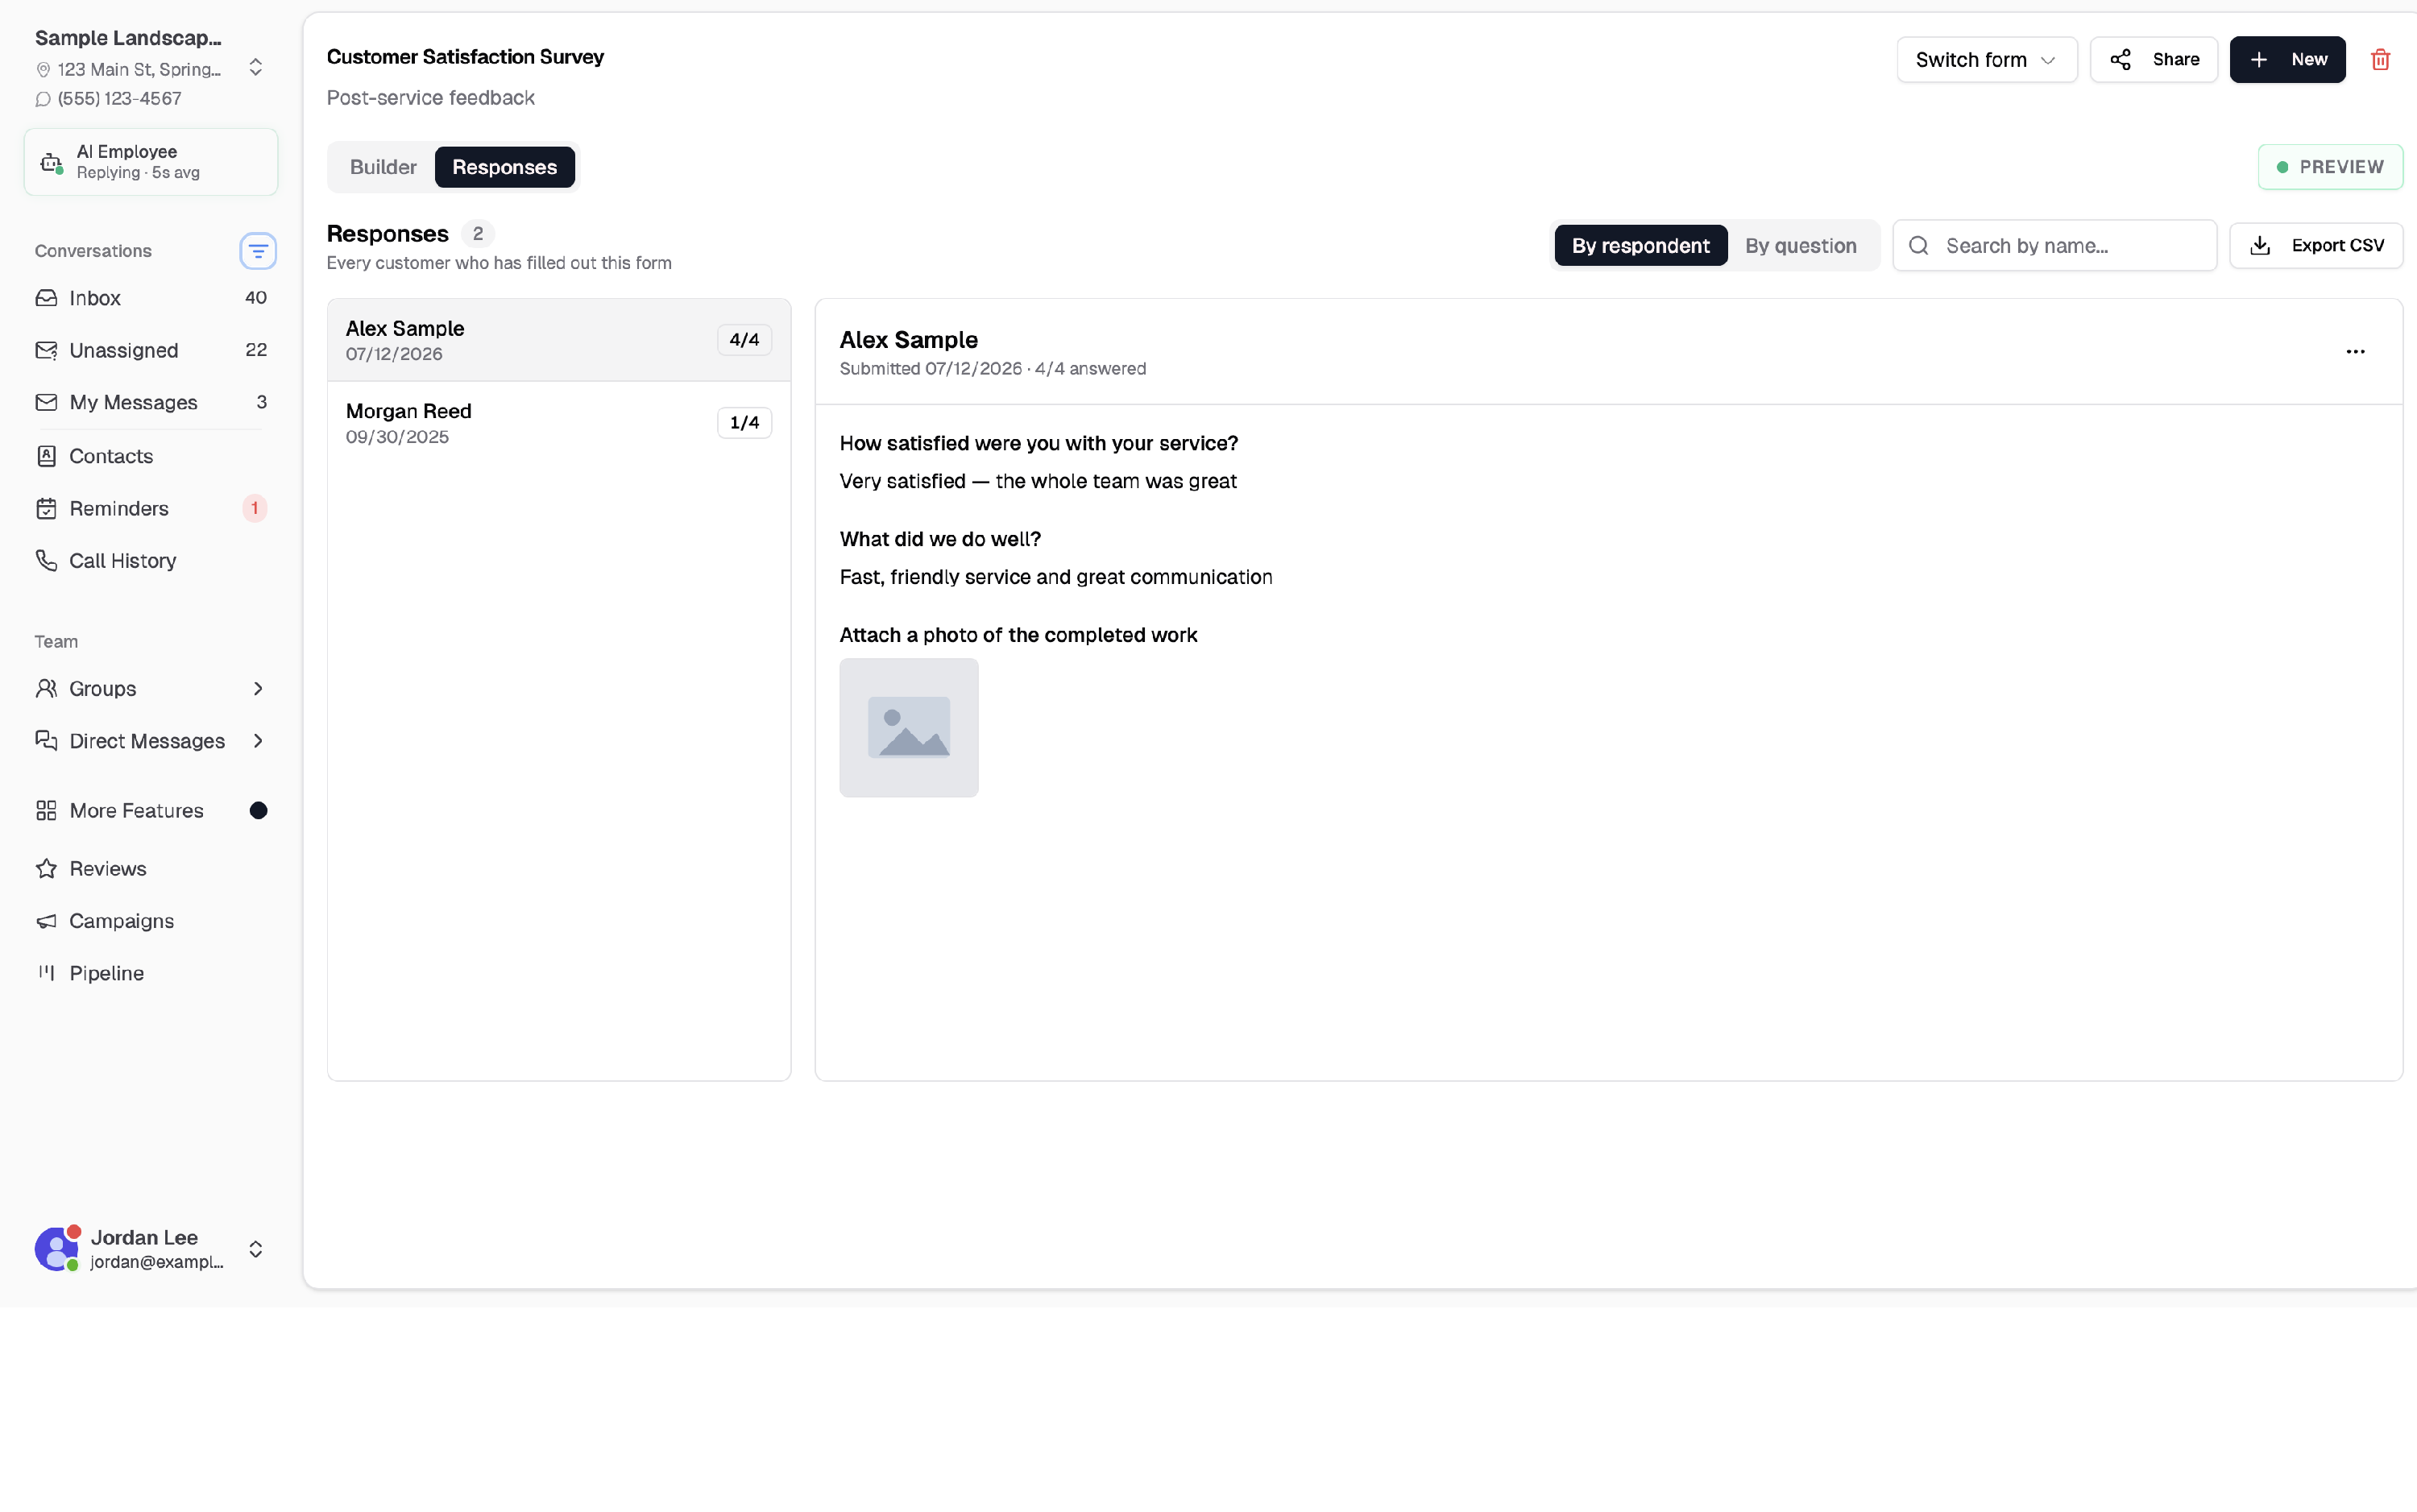
Responses are also available inside Messenger when you click View responses on a form submission in the chat.
Send form submissions to your Pipeline
You can turn every form submission into a card (ticket) on a Pipeline board, so new enquiries are tracked, assigned, and worked through your stages automatically. This is great for website enquiry forms, quote requests, and service bookings.
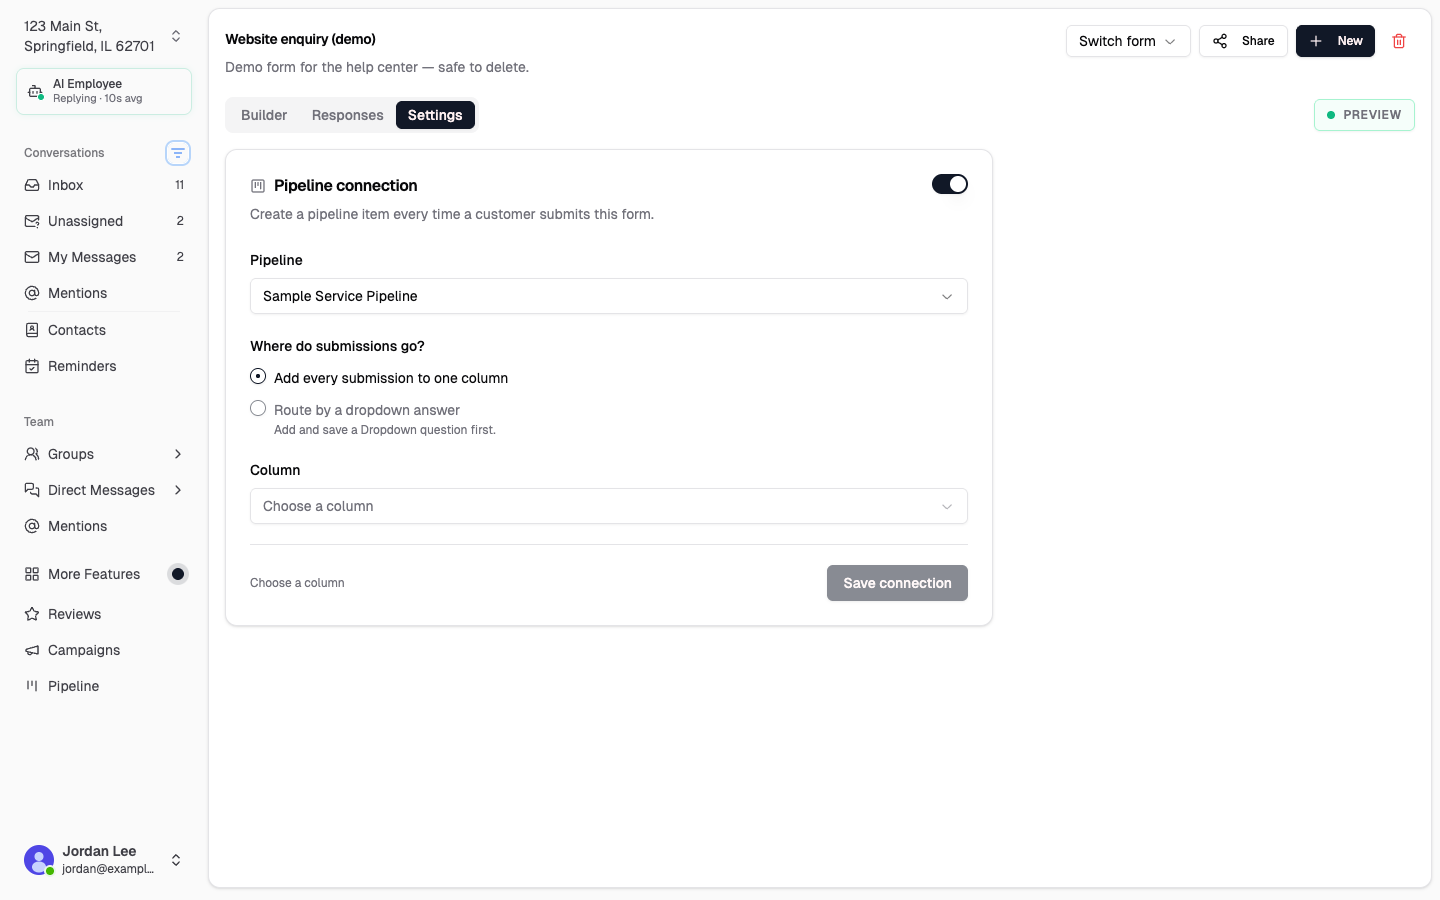
- Open the form and go to the Settings tab.
- Turn on Pipeline connection.
- Choose the pipeline submissions should go to. (No pipeline yet? Create one first on the Pipeline page.)
- Choose where submissions go:
- Add every submission to one column — pick a single column (for example, "New leads"). Every submission lands there.
- Route by a dropdown answer — the card's column is chosen by the customer's answer to a Dropdown question on the form. Map each option to a column, and pick a fallback column for anything unmapped or skipped so no submission is ever dropped. (You'll need a saved Dropdown question on the form to use this option.)
- Click Save connection.
From then on, each submission creates one pipeline card — marked with a Form badge. The card is named after the customer, the description lists their answers, and the customer is attached so you can follow up from the board. Open the card and click View form submission to see the full answers. A column's item limit never blocks these cards, so a full stage won't drop a new lead.
To stop creating cards, turn Pipeline connection off (choose Disconnect). New submissions will no longer create pipeline items; cards already created are kept.
Delete a form
- Open the form in the builder.
- Click the trash icon and confirm Delete form.
Deleting a form permanently removes its questions and customer responses.
Tips
- Keep forms short and focused to encourage completions.
- Use Preview before sending or embedding.
- Send a thank-you message after customers submit.
- Create separate forms for different touchpoints (after service, after delivery, post-support, etc.).
Related articles
- Using the Pipeline (for form submissions that create pipeline cards)
- How do I set up Textchat? (for allowed websites when embedding forms)
- Messaging Consent
Need help?
If you're having trouble building, sending, or embedding forms, email support@chekkit.io with your business name and a short description of the issue.